写一个 vscode 插件
创建项目
- 首先安装 nodejs 环境
安装 yeoman,这是一个脚手架程序,用于快速创建一个新项
1
 npm install --global yo
使用 yeoman 创建一个 vscode extension 项目
1
 npx yo code
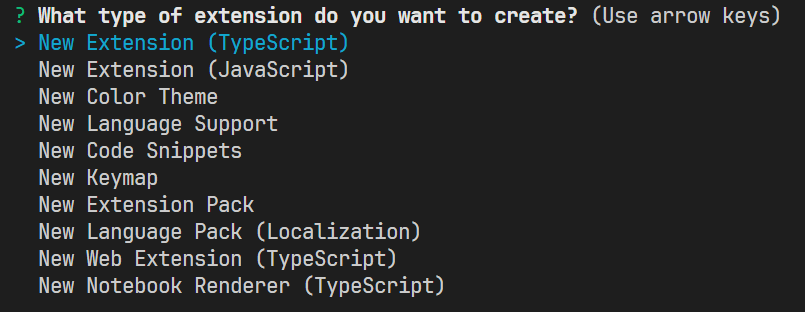
选择
New Extension (TypeScript),填写信息
选择一种打包方式,这里使用
webpack打包方式,之后选择npm为包管理器
至此,一个 vscode extension 脚手架项目就创建完毕了
开发
现在我们开发一款 vscode extension,功能是在 vscode 中打开一个 web 页面,自动读取当前项目中的特定文件,在网页上进行图形化的编辑,最后将修改写回文件中。
安装依赖
首先安装项目所需的 npm 包,在项目路径下执行:
1
npm install @types/react @types/react-dom @rjsf/core @rjsf/validator-ajv8 bootstrap@3.4.1 react react-dom style-loader css-loader
注册 extension 命令
我们需要在 package.json 中注册 extension 支持的命令:
1
2
3
4
5
6
7
8
9
10
11
12
13
// package.json
{
  // ...
  "contributes": {
    "commands": [
      {
        "command": "cosem.openForm",
        "title": "Open a web page for editing the configuration"
      }
    ]
  },
  // ...
}
编写 extension 主程序
编辑脚手架项目中的 src/extension.ts,该文件主要分为4个部分:
第一部分是包引用部分:
1
2
import * as vscode from 'vscode';
import * as path from 'path';
第二部分是 activate 函数,包含启动插件的方式以及插件的主要功能:
1
2
3
4
5
6
7
8
9
10
11
12
13
14
15
16
17
18
19
20
21
22
23
24
25
26
27
28
29
30
31
32
33
34
35
36
37
38
39
40
41
42
43
44
45
46
47
48
49
50
51
52
53
54
55
56
57
58
59
60
61
62
63
64
65
66
67
68
69
70
71
72
73
74
75
76
77
78
79
export function activate(context: vscode.ExtensionContext) {
  console.log('COSEM VSCode extension is activated.');

  // 注册插件,定义当收到 vscode 发来的 cosem.openForm 命令时执行的操作
  let disposable = vscode.commands.registerCommand('cosem.openForm', async () => {
    // 启动插件后创建一个新标签页,在其中打开一个 webview
    const panel = vscode.window.createWebviewPanel(
      'cosemForm',
      'COSEM Form',
      vscode.ViewColumn.One,
      {
        enableScripts: true,
        retainContextWhenHidden: true, // 离开焦点后隐藏界面而不是销毁上下文
        localResourceRoots: [
          vscode.Uri.file(path.join(context.extensionPath, 'dist', 'webview'))
        ]
      }
    );

    // 在当前工作路径下找到相应的文件并读取
    const workspaceFolders = vscode.workspace.workspaceFolders;
    if (!workspaceFolders) {
      vscode.window.showErrorMessage('No workspace folder found.');
      return;
    }
    const workspaceFolder = workspaceFolders[0].uri;

    async function readFile(fileName: string): Promise<string> {
      try {
        const fileUri = vscode.Uri.joinPath(workspaceFolder, fileName);
        const fileData = await vscode.workspace.fs.readFile(fileUri);
        return fileData.toString();
      } catch (error) {
        console.error(`Error reading ${fileName}:`, error);
        return '';
      }
    }

    const [jsonSchema, uiSchema, formData, scriptLogic] = await Promise.all([
      readFile('cosemschema.json'),
      readFile('cosemui.json'),
      readFile('cosemobject.json'),
      readFile('script.js')
    ]);

    const formConfig = {
      jsonSchema: jsonSchema ? JSON.parse(jsonSchema) : {},
      uiSchema: uiSchema ? JSON.parse(uiSchema) : {},
      formData: formData ? JSON.parse(formData) : {},
      scriptLogic: scriptLogic || ''
    };

    const scriptUri = panel.webview.asWebviewUri(
      vscode.Uri.file(path.join(context.extensionPath, 'dist', 'webview', 'bundle.js'))
    );

    // 定义webview显示的内容,并将读取到的文件数据提供给 webview
    panel.webview.html = getWebviewContent(scriptUri, formConfig);

    // 接收 webview 提交的表单数据
    panel.webview.onDidReceiveMessage(async (message) => {
      switch (message.type) {
        case 'formSubmit':
          const updatedData = message.data;
          try {
            const fileUri = vscode.Uri.joinPath(workspaceFolder, 'cosemobject.json');
            const buffer = Buffer.from(JSON.stringify(updatedData, null, 2), 'utf8');
            await vscode.workspace.fs.writeFile(fileUri, buffer);
            vscode.window.showInformationMessage('Form data saved successfully.');
          } catch (error) {
            vscode.window.showErrorMessage('Failed to save form data.');
          }
          return;
      }
    });
  });

  context.subscriptions.push(disposable);
}
第三部分是 deactivate 函数,定义插件退出时的清理动作,我们这里没有该需求,不实现:
1
export function deactivate() {}
第四部分是自定义函数,主要是给 activate 和 deactivate 函数的实现用的,这里定义的 getWebviewContent 用来给 activate 函数提供定义网页显示内容的功能:
1
2
3
4
5
6
7
8
9
10
11
12
13
14
15
16
17
18
function getWebviewContent(scriptUri: vscode.Uri, formConfig: any): string {
  const configScript = `<script>
    window.vscode = acquireVsCodeApi();
    window.__FORM_CONFIG__ = ${JSON.stringify(formConfig)};
  </script>`;
  return `<!DOCTYPE html>
<html lang="en">
<head>
  <meta charset="UTF-8">
  <title>COSEM Form</title>
</head>
<body>
  <div id="root"></div>
  ${configScript}
  <script src="${scriptUri}"></script>
</body>
</html>`;
}
编写 extension 的 webview 部分
在 src 目录下创建 webview 目录,在其中创建 index.tsx 和 App.tsx 文件:
1
2
3
4
5
6
7
8
9
10
11
12
13
14
15
16
17
18
19
20
21
22
23
24
25
26
27
28
29
30
31
32
33
34
35
36
37
38
39
40
41
42
43
44
45
46
47
48
49
50
51
52
53
54
55
56
57
58
59
60
61
62
63
64
65
66
67
68
69
70
71
// src/webview/App.tsx
import * as React from 'react';
import Form,{ IChangeEvent } from '@rjsf/core';
import validator from '@rjsf/validator-ajv8';
import 'bootstrap/dist/css/bootstrap.min.css';

// 通过 Window 对象获取从 vscode extension 主程序
declare global {
  interface Window {
    __FORM_CONFIG__: {
      jsonSchema: any;
      uiSchema: any;
      formData: any;
      scriptLogic: string;
    };
    vscode?: {
      postMessage: (message: any) => void;
    };
    // 如果 script.js 中定义了 customValidate,则全局可调用
    customValidate?: (formData: any, errors: any) => void;
  }
}

const App: React.FC = () => {
  const { jsonSchema, uiSchema, formData, scriptLogic } = window.__FORM_CONFIG__;

  React.useEffect(() => {
    if (scriptLogic) {
      try {
        // 执行附加逻辑代码,如果 script.js 定义了 window.customValidate 则可直接使用
        new Function(scriptLogic)();
      } catch (error) {
        console.error('Error executing scriptLogic:', error);
      }
    }
  }, [scriptLogic]);

  const customValidate = (formData: any, errors: any) => {
    if (typeof window.customValidate === 'function') {
      window.customValidate(formData, errors);
    }
    return errors;
  };

  const onSubmit = (data: IChangeEvent<any>, event: React.FormEvent<HTMLFormElement>) => {
    const { formData } = data;
    if (window.vscode) {
      window.vscode.postMessage({ type: 'formSubmit', data: formData });
    } else {
      console.log('Form submitted:', formData);
    }
  };

  // 创建一个 rjfs 库提供的 Form 对象,本文件其他部分都是为了提供该对象的构造参数
  return (
    <div style=>
      <Form
        schema={jsonSchema}
        uiSchema={uiSchema}
        formData={formData}
        onSubmit={onSubmit}
        customValidate={customValidate}
        validator={validator}
      >
        <button type="submit">Submit</button>
      </Form>
    </div>
  );
};

export default App;
1
2
3
4
5
6
7
8
9
10
// src/webview/index.tsx
import React from 'react';
import { createRoot } from 'react-dom/client';
import App from './App';

const container = document.getElementById('root');
if (container) {
  const root = createRoot(container);
  root.render(<App />);
}
webpack 打包配置
webpack 需要实现对 extension 主程序(extension.ts) 和 webview 程序(webview/index.tsx) 的分别打包,修改 webpack.config.js:
1
2
3
4
5
6
7
8
9
10
11
12
13
14
15
16
17
18
19
20
21
22
23
24
25
26
27
28
29
30
31
32
33
34
35
36
37
38
39
40
41
42
43
44
45
46
47
48
49
50
51
52
53
54
55
56
57
58
59
60
61
62
63
64
65
66
67
68
const path = require('path');

module.exports = [
  {
    // extension 打包配置(Node 环境)
    mode: process.env.NODE_ENV || 'production',
    target: 'node',
    entry: './src/extension.ts',
    output: {
      path: path.resolve(__dirname, 'dist'),
      filename: 'extension.js',
      libraryTarget: 'commonjs2'
    },
    externals: {
      vscode: 'commonjs vscode'
    },
    resolve: {
      extensions: ['.ts', '.js']
    },
    module: {
      rules: [
        {
          test: /\.ts$/,
          exclude: /node_modules/,
          use: 'ts-loader'
        },
        {
          enforce: 'pre',
          test: /\.js$/,
          loader: 'source-map-loader'
        }
      ]
    },
    devtool: 'source-map'
  },
  {
    // webview 打包配置(浏览器环境)
    mode: process.env.NODE_ENV || 'production',
    target: 'web',
    entry: './src/webview/index.tsx',
    output: {
      path: path.resolve(__dirname, 'dist', 'webview'),
      filename: 'bundle.js'
    },
    resolve: {
      extensions: ['.ts', '.tsx', '.js']
    },
    module: {
      rules: [
        {
          test: /\.(ts|tsx)$/,
          exclude: /node_modules/,
          use: 'ts-loader'
        },
        {
          test: /\.js$/,
          exclude: /node_modules/,
          use: 'babel-loader'
        },
        {
          test: /\.css$/,  // 处理 CSS 文件
          use: ['style-loader', 'css-loader']  // 加载并插入样式
        }
      ]
    },
    devtool: 'source-map'
  }
];
ts 编译选项
编辑 tsconfig.json,针对当前项目配置合适的编译选项,静态检查和编译都会利用这些选项:
1
2
3
4
5
6
7
8
9
10
11
12
13
14
15
16
17
18
{
	"compilerOptions": {
		"module": "Node16",
		"target": "ES2022",
		"lib": [
			"ES2022",
			 "DOM"
		],
		"sourceMap": true,
		"rootDir": "src",
		"jsx": "react",
		"strict": true,   /* enable all strict type-checking options */
		/* Additional Checks */
		// "noImplicitReturns": true, /* Report error when not all code paths in function return a value. */
		// "noFallthroughCasesInSwitch": true, /* Report errors for fallthrough cases in switch statement. */
		// "noUnusedParameters": true,  /* Report errors on unused parameters. */
	}
}
调试和打包
万事俱备,现在可以对项目进行编译了,在 extension 项目路径下执行:
1
npm run compile
会将 extension 主程序打包为 dist/extension.js,将 webview 程序打包为 dist/webview/bundle.js。
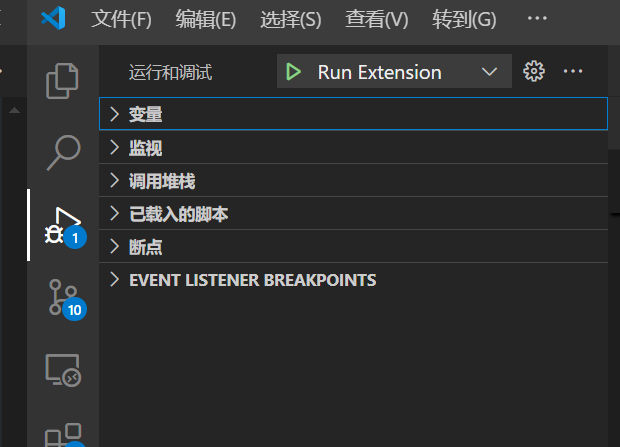
调试
使用 vscode 的 运行和调试 功能,点击 Run Extension 按钮
在打开的 vscode 窗口中打开一个工作目录,创建相应的文件,使用 ctrl+shift+p 运行 cosem.openForm 即可调试。
打开的 webview 可以通过 ctrl + shift + i 打开调试控制台
打包
安装打包工具:
1
npm install -g vsce
打包为 vsix 文件:
1
vsce package